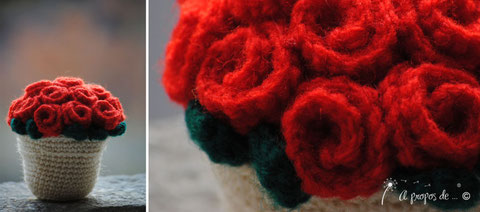
Ecco per voi il nostro primissimo tutorial!! In questo post vi spiegheremo come potete fare con la tecnica dell’amigurumi (uncinetto) un vasetto con delle rose rosse.
Abbiamo usato degli schemi trovati su internet e per le foglie e le rose abbiamo usato la nostra immaginazione. Purtroppo lo schema è in Inglese, ma è abbastanza facile da capire. Comunque per qualsiasi problema non esitate a contattarci!
A. IL VASO
Per fare il vaso usate lo schema qui sotto riportato.
Lo schema è proprietà di Lion Brand Wool-Ease® Yarn e lo potete trovare su http://www.lionbrand.com/ "Amigurumi Potted Plant".
NOTES: Work in continuous rnds; do not join or turn unless otherwise instructed.
With color A, ch 2.
Rnd 1: Work 6 sc in first ch. Place marker in first st for beg of rnd; move marker up as each rnd is
completed.
Rnd 2: Work 2 sc in each st around – 12 sts.
Rnd 3: *2 sc in next st, sc in next st, rep from * around – 18 sts.
Rnd 4: *2 sc in next st, sc in each of next 2 sts, rep from * around – 24 sts.
Rnd 5: *2 sc in next st, sc in each of next 3 sts, rep from * around – 30 sts.
Rnd 6: Working in back loops only, sc in each st around – 30 sts.
Rnd 7: *2 sc in next st, sc in each of next 9 sts, rep from * around – 33 sts.
Rnd 8: Sc in each st around – 33 sts.
Rnd 9: *2 sc in next st, sc in each of next 10 sts, rep from * around – 36 sts.
Rnd 10: Sc in each st around – 36 sts.
Rnd 11: *2 sc in next st, sc in each of next 11 sts, rep from * around – 39 sts.
Rnd 12: Sc in each st around – 39 sts.
Rnd 13: *2 sc in next st, sc in each of next 12 sts, rep from * around – 42 sts.
Rnd 14: Sc in each sc around – 42 sts.
Rnd 15: Working in front loops only, work *2 sc in next st, sc in each of next 6 sts, rep from * around – 48
sts.
Rnd 16: Working in back loops only, sc in each st around – 48 sts.
Rnds 17 and 18: Sc in each st around.
Fasten off.
B. IL SOPRA DEL VASO
Per fare la parte superiore del vaso usate lo schema qui sotto riportato.
Lo schema è proprietà di Lion Brand Wool-Ease® Yarn e lo potete trovare su http://www.lionbrand.com/ "Amigurumi Potted Plant".
NOTES: Work in continuous rnds; do not join or turn unless otherwise instructed.
With color B, ch 2.
Rnd 1: Work 6 sc in first ch. Place marker in first st for beg of rnd; move marker up as each rnd is
completed.
Rnd 2: Work 2 sc in each st around – 12 sts.
Rnd 3: *2 sc in next st, sc in next st, rep from * around – 18 sts.
Rnd 4: *2 sc in next st, sc in each of next 2 sts, rep from * around – 24 sts.
Rnd 5: *2 sc in next st, sc in each of next 3 sts, rep from * around – 30 sts.
Rnd 6: *2 sc in next st, sc in each of next 4 sts, rep from * around – 36 sts.
Rnd 7: *2 sc in next st, sc in each of next 5 sts, rep from * around – 42 sts.
Rnd 8: *2 sc in next st, sc in each of next 6 sts, rep from * around – 48 sts.
Rnds 9-14: Sc in each st around.
Fasten off.
C. LE ROSE
Per fare le rose usate lo schema qui sotto riportato. Fatene 16.
With color C, ch 10.
Rnd 1: 2 sc across, ch 1, turn (total rnd 18)
Rnd 2: 2 sc across (36)
Fasten off
D. LE FOGLIE
Per fare le foglie usate lo schema qui sotto riportato. Fatene 10.
With color C, ch 4.
Work 2 dc in second ch from hook, hdc in next ch, 3 sc in last ch.
Working along opposite side of beginning chain: hdc in next ch, 2 dc in next ch, sl st in next ch.
Fasten off.
Ho riempito il vasetto con del ripieno per cuscini o pupazzi, ho cucito le rose e le foglie sulla parte superiore, poi ho cucito la parte superiore al vaso, aggiungendo dell'altra ovatta o gomma piuma.
beg = begin(s)(ning)
rep = repeat(s)(ing)
rnd(s) = round(s)
ch = chain
sl st = slip stitch
sc = single crochet
hdc = half double crochet
dc = double crochet
sc2tog (sc decrease) Insert hook into st and draw up a loop. Insert hook into next st and draw up a loop. Yarn over, draw through all 3 loops on hook.


Scrivi commento